Friday 18 March 2016

How to change form color by company in Microsoft Dynamics AX 2012

How to change color based on the company in Microsoft Dynamics AX 2012


I came across the client’s new requirement in Microsoft dynamics ax 2012 that, they want to identify in which company they are currently working by the color. On the base of color they define the company.

The issue is users are working on the same form with multiple legal entity at a time. This causes them the issue of data capturing. By mistake entering in wrong legal entity. On the base of color they can easily identify the company.
Here is the list of steps which we follow
  • Create Extended datatype
  • Create Table “CompanyColor”
  • Add Table to OMLegalEntity form
  • Create methods on the form
  • Edit class SysSetupFormRun
  • Set company wise color
  • Result


Extended datatype
  1. CompanyformColor
  2. CompanyID


Create Table “CompanyColor”
Fields
  1. CompanyformColor – Real, attach extended data type “CompanyFormColor”
  2. CompanyId – String, attach extended data type “CompanyID”


Add Table to OMLegalEntity form
Open data source and create new data source and add Table Created above “CompanyColor”
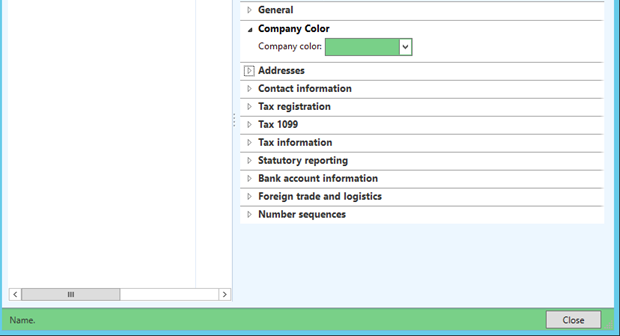
Open Design and Create new Tab under “General Tab” and drag CompanyformColor field from the CompanyColor table
Add lookup Method on CompanyformColor field
public void lookup()
{


   int red;
   int green;
   int blue;
   container color;


   [red, green, blue] = WinApi::RGBint2Con(
                   CompanyColor_CompanyFormColor.backgroundColor());
                   color = WinAPI::chooseColor(
                   element.hWnd(),
                   red,
                   green,
                   blue,
                   null,
                   true);


   if (color)
   {
   [red, green, blue] = color;
   CompanyColor1.CompanyFormColor = WinAPI::RGB2int(red,green,blue);
   CompanyColor_CompanyFormColor.backgroundColor(real2int(CompanyColor1.CompanyFormColor));
   }
}


Add modified Method on CompanyformColor field


public boolean modified()
{
   boolean ret;


   ret = super();


   //if no company color exists, delete the CompanyColor record
   if (!CompanyColor1.CompanyFormColor)
   {
       CompanyColor1.delete();
   }


   return ret;
}


Edit class SysSetupFormRun
public void run()
{
   FormTabControl   tab;
   //ChangeTabPageColors changeTabPageColors;
   int companyColor;
   ;


   super();


   // Switch and based on the current company change colors, or not for default
   if (CompanyColor::find(curext()).CompanyFormColor)
   {
       // Set the color scheme of this instance of the SysFormRun to RGB
       companyColor = real2int(CompanyColor::find(curext()).CompanyFormColor);
        
// code here to apply color to control       

       
   }
}


Set Color for the legal entity
Go to > Organization administration > setup > legal entities. Select the legal entity and select color


Restart the AX client, here is the result


This helped you..!! Then hit the ads on the page..:)


Friday 4 March 2016

Duplicate type with name 'Dynamics.Ax.Application.' in assembly 'Dynamics.Ax.Application


While using .NET web services i got the below error in dynamics ax 2012:


Duplicate type with name 'Dynamics.Ax.Application.' in assembly 'Dynamics.Ax.Application


On dynamics AX 2012
the solution for above issue is as below:

Stop the AOS
Rename XPPIL folder at path: C:\Program Files\Microsoft Dynamics AX\60\Server\MicrosoftDynamicsAX \bin
Start the AOS
Generate full CIL

This steps resolved my issue.


This helped you..!! Then comment below..:)

Wednesday 2 March 2016

Create custom workflow Microsoft Dynamics AX 2012

workflow


Here we work on how to create custom workflow using x++ dynamics ax 2012. It’s simple and easy to do with the following steps in dynamics ax 2012.


The following steps shows to create custom workflow for new created customer approval. Below are the objects needs to be created:
  • Base Enum
  • WorkflowApprovalStatus field
  • Method on CustTable
  • Query
  • Workflow category
  • Workflow type
  • Workflow approval
  • Drag workflow approval to workflow type
  • Enable workflow on form


  1. BaseEnum:
Create “CustWFApprovalStatus” base enum for the workflow approval status
  • Not Submitted
  • Submitted
  • Pending Approval
  • Change Request
  • Approved
  • Reject


  1. Create new Field on CustTable:
Create Enum type field ‘WorkflowApprovalStatus ‘ on CustTable and assign CustWFApprovalStatus to enumtype


  1. Override Method on CustTable:
Override canSubmitToWorkflow method on CustTable
public boolean canSubmitToWorkflow(str _workflowType = '')
{    
   boolean ret;


   ret = this.RecId != 0 && this.WorkflowApprovalStatus == CustWFApprovalStatus::NotSubmitted;


   return ret;
}


New Method on CustTable:
Create new method UpdateCustWorkflowState on CustTable to update status


public static void UpdateCustWorkflowState(RefRecId _recId, CustWFApprovalStatus _state)
{
   CustTable custTable = CustTable::findRecId(_recId, true);


   ttsBegin;


   custTable.WorkflowApprovalStatus = _state;
   custTable.update();


   ttsCommit;
}


  1. Query:
Here we use CustTableListPage query. Hence no need to create new query. Add WorkflowApprovalStatus field on query to display on customer list page.


  1. Workflow Category:
Here we use CustCategory as it has customer module attached with it.


  1. Workflow Type:

  1. In the AOT, expand the Workflow node.
  2. Right-click the Workflow Types node, and then click Add-Ins > Workflow type wizard. The Workflow wizard is displayed. This wizard will help you create a new workflow type.
  3. Click Next.
  4. Set the following values for the wizard.


This will create a private project as below:


After the workflow type is created, you will add code for the workflow events.
Add below code to the CustAprWorkflowTypeSubmitManager class on workflow type project


public static void main(Args _args)
{
    // Variable declaration.
   CustTable                           CustTable;
   CustAprWorkflowTypeSubmitManager    submitManger;   
   recId _recId =                      _args.record().RecId;
   WorkflowCorrelationId               _workflowCorrelationId;


   workflowTypeName                    _workflowTypeName = workFlowTypeStr("CustAprWorkflowType");
   WorkflowComment                     note = "";
   WorkflowSubmitDialog                workflowSubmitDialog;
   submitManger =                      new CustAprWorkflowTypeSubmitManager();


   //Opens the submit to workflow dialog.
   workflowSubmitDialog = WorkflowSubmitDialog::construct(_args.caller().getActiveWorkflowConfiguration());
   workflowSubmitDialog.run();


   if (workflowSubmitDialog.parmIsClosedOK())
   {
       CustTable = _args.record();
       // Get comments from the submit to workflow dialog.
       note = workflowSubmitDialog.parmWorkflowComment();


       try
       {
           ttsbegin;
           // Activate the workflow.
           _workflowCorrelationId = Workflow::activateFromWorkflowType(_workflowTypeName, CustTable.RecId, note, NoYes::No);


           CustTable.WorkflowApprovalStatus = CustWFApprovalStatus::Submitted;
           CustTable.update();
           ttscommit;


           // Send an Infolog message.
           info("Submitted to workflow.");
       }
       catch (Exception::Error)
       {
           error("Error on workflow activation.");
       }
   }


   _args.caller().updateWorkFlowControls();
   
}


  1. Workflow Approval

    1. Open the AOT.
    2. Expand the Workflow node.
    3. Right-click on Approvals and select Add-ins > Approval wizard.
    4. Click Next.


This wizard will create the private project as below:


Now, Update code on CustApprWorkflowApprEventHandler for different events
public void started(WorkflowElementEventArgs _workflowElementEventArgs)
{
   CustTable::UpdateCustWorkflowState(_workflowElementEventArgs.parmWorkflowContext().parmRecId(),CustWFApprovalStatus::Submitted);
}


public void completed(WorkflowElementEventArgs _workflowElementEventArgs)
{
   CustTable::UpdateCustWorkflowState(_workflowElementEventArgs.parmWorkflowContext().parmRecId(), CustWFApprovalStatus::Approved);
}


public void changeRequested(WorkflowElementEventArgs _workflowElementEventArgs)
{
   CustTable::UpdateCustWorkflowState(_workflowElementEventArgs.parmWorkflowContext().parmRecId(),  CustWFApprovalStatus::ChangeRequest);
}


public void canceled(WorkflowElementEventArgs _workflowElementEventArgs)
{
   CustTable::UpdateCustWorkflowState(_workflowElementEventArgs.parmWorkflowContext().parmRecId(),  CustWFApprovalStatus::Rejected);
}


Update Lables on Menuitems


  • CustApprWorkflowApprApprove  set label as Approve
  • CustApprWorkflowApprReject set label as Reject
  • CustApprWorkflowApprRequestChange set label as Request change


  1. Drag workflow approval to workflow type


Drag workflow approval to workflow type under CustAprWorkflowType > Supported elements


  1. Enable workflow on form


  • Go to AOT > Forms > CustTableListPage
  • Go to Designs > Design
  • Right click > Properties


That’s it now everything is setup and ready to go. But before start do incremental CIL and this is must. Every time you change the code, CIL is required. 

for workflow on Dynamics 365 F&O click here


This helped you..!! comment it below to encourage for more posts like this..:)